
前提:已安装Git和Anaconda环境
- Git:应该是安装Command_Line_Tools_for_Xcode之后即可
- Anaconda:https://mirrors.tuna.tsinghua.edu.cn/anaconda/archive/,从清华镜像站下载安装即可
- 安装brew:参考 mac安装homebrew失败怎么办? - 金牛肖马的回答 - 知乎
1
/bin/zsh -c "$(curl -fsSL https://gitee.com/cunkai/HomebrewCN/raw/master/Homebrew.sh)"
- 安装wget:
1
brew install wget
1 安装iterm2
前往iterm2官网下载安装
2 安装oh-my-zsh
GitHub仓库地址:https://github.com/ohmyzsh/ohmyzsh 安装方法如下(貌似需要科学skr上网):
1
2
3
4
5
6
# curl下载
sh -c "$(curl -fsSL https://raw.githubusercontent.com/ohmyzsh/ohmyzsh/master/tools/install.sh)"
# wget下载
sh -c "$(wget -O- https://raw.githubusercontent.com/ohmyzsh/ohmyzsh/master/tools/install.sh)"
# fetch下载
sh -c "$(fetch -o - https://raw.githubusercontent.com/ohmyzsh/ohmyzsh/master/tools/install.sh)"
配置文件的备份与创建
1
2
3
4
# 备份原配置文件
cp ~/.zshrc ~/.zshrc_bp
# 创建新的配置文件
cp ~/.oh-my-zsh/templates/zshrc.zsh-template ~/.zshrc
Note: 如果在这之前安装了Anaconda,可能需要将原配置文件中的环境变量设置拷贝到新的配置文件中。
3 安装PowerLine
1
pip install powerline-status
Note:此处我已经安装过Anaconda
4 安装PowerFonts
GitHub仓库:https://github.com/powerline/fonts 好像很多主题必须得改用Meslo字体,否则会导致显示乱码。
1
2
3
4
5
6
7
8
# 新建文件夹,用来存储相关资源
mkdir -p ~/The/Path/U/Like
cd ~/The/Path/U/Like
# 下载源码
git clone https://github.com/powerline/fonts.git --depth=1
cd fonts
# 安装字体
./install.sh
安装好字体之后,进入iterm2的Preferences中进行设置 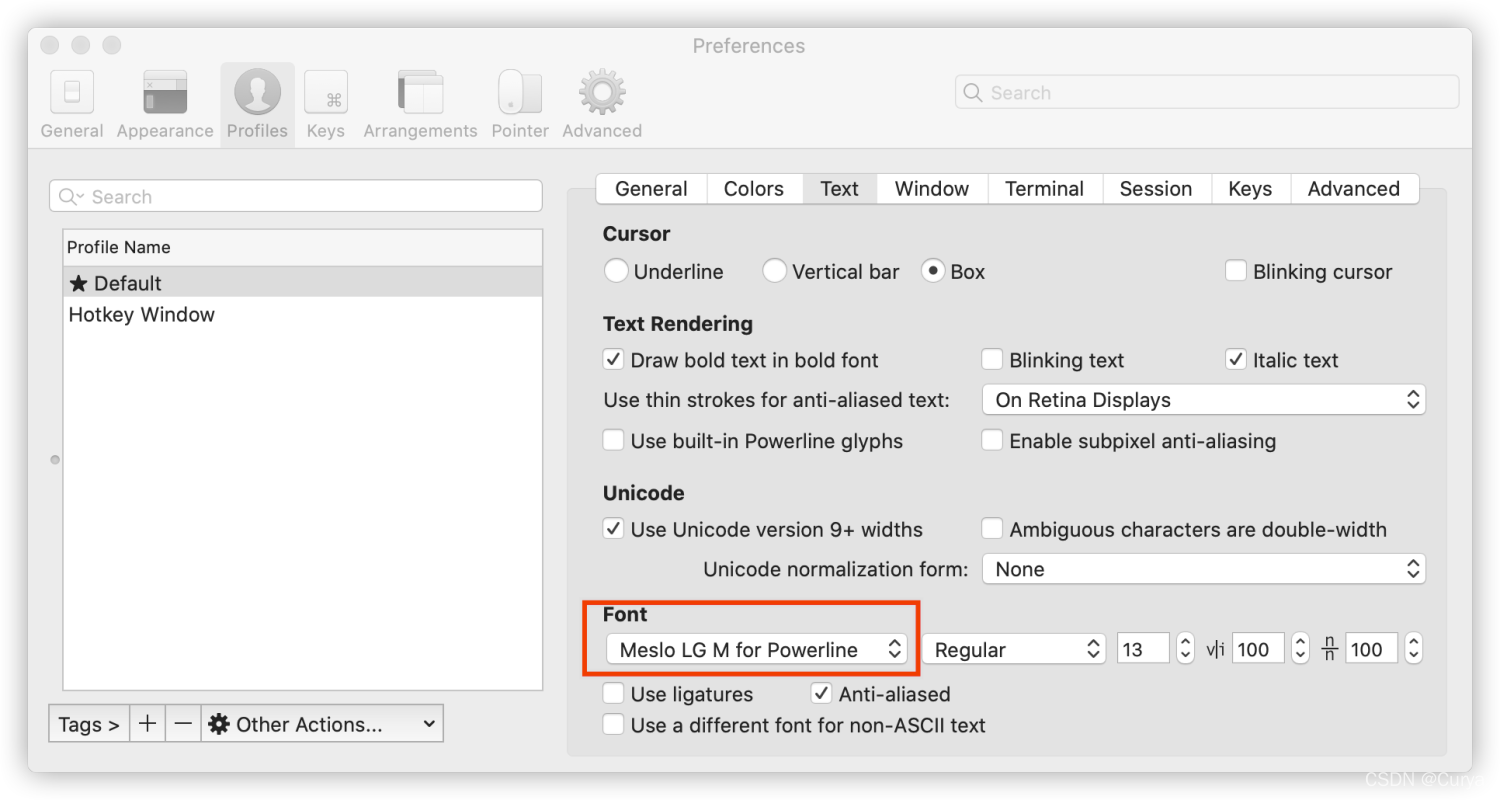
5 安装Dracula主题
5.1 Dracula for ZSH
GitHub仓库地址:https://github.com/dracula/zsh
1
2
3
4
5
6
7
8
9
10
# 新建文件夹,用来存储Dracula相关资源
mkdir -p ~/The/Path/U/Like/Dracula
cd ~/The/Path/U/Like/Dracula
# 下载主题资源
git clone https://github.com/dracula/zsh.git
# 复制文件
cp ./zsh/dracula.zsh-theme ~/.oh-my-zsh/themes/
# 参考GitHub仓库issue#11,https://github.com/dracula/zsh/issues/11
cd ./zsh/
cp -r ./lib/ ~/.oh-my-zsh/themes/
安装完成之后,需要修改~/.zshrc文件,参见https://draculatheme.com/zsh,如下: 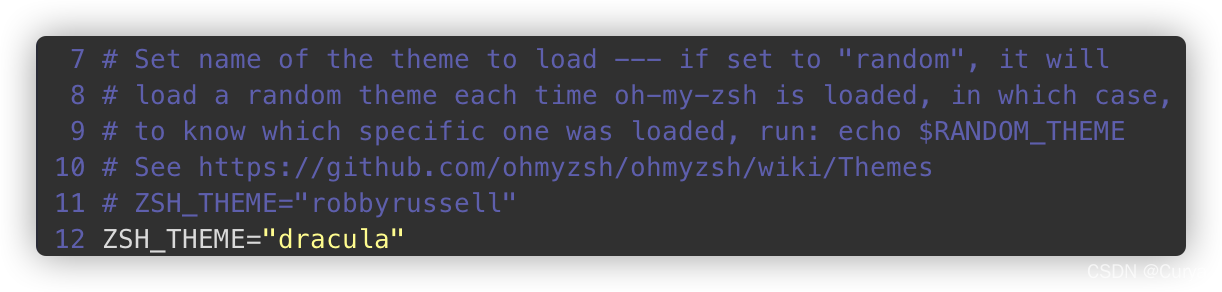
修改之后,激活~/.zshrc文件
1
source ~/.zshrc
5.2 Dracula for iterm2
GitHub仓库地址:https://github.com/dracula/iterm
1
2
3
cd ~/The/Path/U/Like/Dracula
# 下载主题资源
git clone https://github.com/dracula/iterm.git
设置主题,参见https://draculatheme.com/iterm: 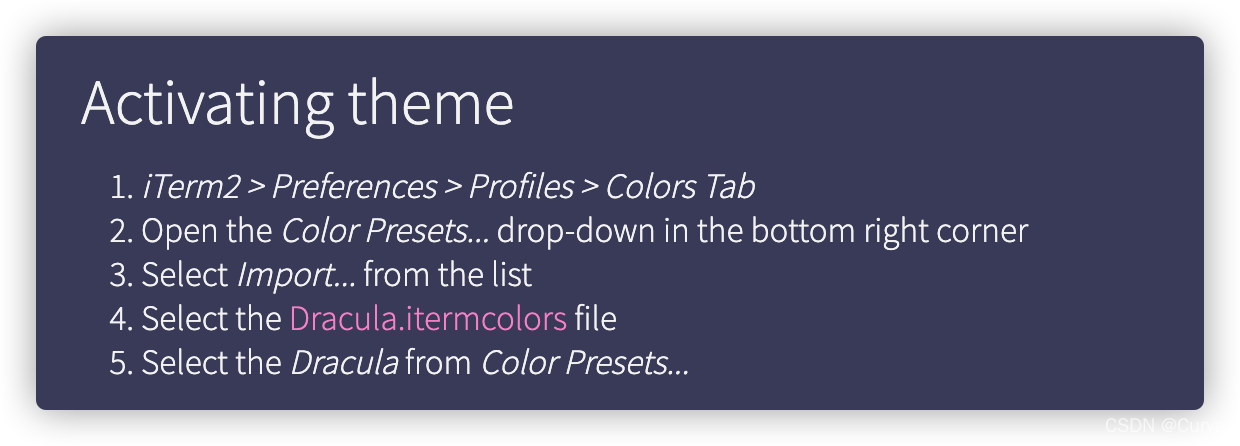
设置完成之后,如下: 
5.3 Dracula for vim
GitHub仓库:https://github.com/dracula/vim 安装参见https://draculatheme.com/vim
1
2
3
4
mkdir -p ~/.vim/pack/themes/start
cd ~/.vim/pack/themes/start
git clone https://github.com/dracula/vim dracula
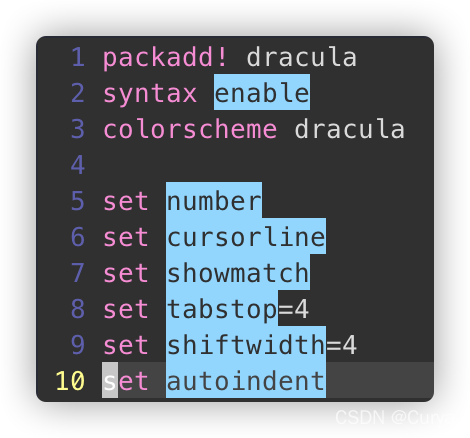
vi ~/.vimrc
6 安装高亮和命令补全插件
高亮插件,GitHub仓库地址:https://github.com/zsh-users/zsh-syntax-highlighting 命令补全插件,GitHub仓库地址:https://github.com/zsh-users/zsh-autosuggestions
1
2
3
4
5
6
7
cd ~/.oh-my-zsh/custom/plugins
git clone https://github.com/zsh-users/zsh-syntax-highlighting
git clone https://github.com/zsh-users/zsh-autosuggestions
# 修改~/.zshrc文件
vi ~/.zshrc
# 修改之后激活环境
source ~/.zshrc
修改内容如下:
1
2
3
4
5
6
7
8
plugins=(
    git
    zsh-autosuggestions
    zsh-syntax-highlighting
)

# 并在文件末尾添加
source ~/.oh-my-zsh/custom/plugins/zsh-syntax-highlighting/zsh-syntax-highlighting.zsh
参考博客: